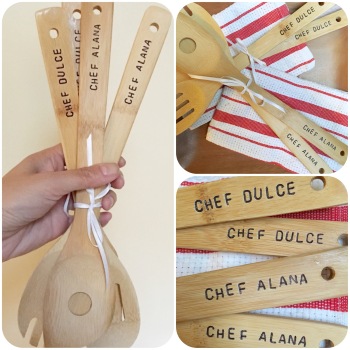
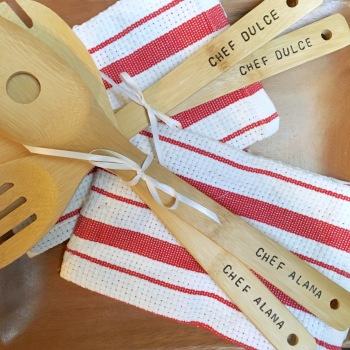
 We LOVE personalized gifts! Today I’m going to show you how to use steel alphabet stamps to customize some wooden spoons that would make a perfect gift for anyone with a kitchen. Caveat: you do need a special set of stamps for this project, but they’re fairly inexpensive. However, you could riff on this idea by freehanding it with any sharp object and a permanent marker, or with a wood burning tool, if you have one.
Keep reading for the instructions.
-Viv
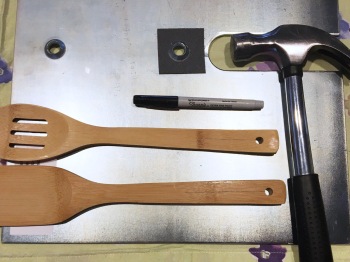
MATERIALS:
- Scrap wood
- Wooden spoons
- Pencil
- Ruler
- Steel alphabet stamp set, such as this one
- Hammer
- Fine tip permanent marker
INSTRUCTIONS:
Use caution and common sense to avoid injuring yourself. Please read all the instructions and the remarks below before you begin. Practice all of the following steps on a piece of scrap wood first. This will help you figure out placement details, and it will allow you to determine the motion and force that will give you the best results.
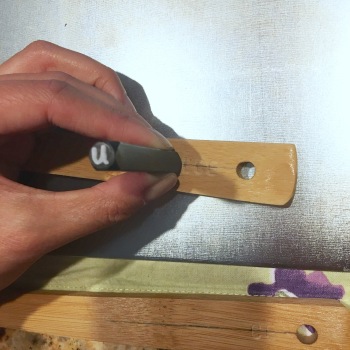
- Decide on the wording you want to stamp, and use a ruler and pencil to draw a guide line. I placed mine in the center, but you can also align your stamping to the top or bottom of your line, if you prefer.
- Hammer your letters one at a time, holding the stamp firmly and as straight as possible. I like to grip the stamp close to the base, so I’m less likely to hit my hand with the hammer.
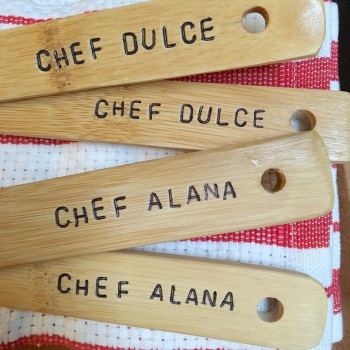
- Darken the letters carefully with the fine-tip permanent marker, to make them more visible.
NOTES/REMARKS:
- Repeating this one, because it’s important: Use caution and common sense to avoid injuring yourself.
- Only darken the letters if you stamped them on the spoon handle, because you don’t want ink from the permanent marker coming in contact with food.
- Some people use several layers of tape to make their guide lines, so they can feel the edge of the stamp line up against the tape. That didn’t work too well for me, because my stamped letters didn’t come out as clear, so I just used my pencil-drawn line as a visual guide. Try it both ways on scrap wood and decide what works best for you. You can also mark guides for spacing.
- Because of the placement of my phrases, I preferred stamping from right to left and eyeballing the spacing, especially because I don’t mind imperfections on handmade items. Going from right to left ensured that I didn’t run out of room. Depending on your project, you may decide to start in the center and work your way outward, or simply work from left to right.
- I also wrote my selected wording on a piece of scrap paper as a reference, since I was stamping from right to left. That way I didn’t have to think about how to spell my phrases backward; I could just follow my reference sheet. (And I still messed up a couple times, which leads me to another remark: practice a LOT, buy inexpensive materials and stock one or two extras, just to be safe!)
- If you’re good at freehand lettering, this would be really cute if you used a wood burning tool. Alternatively, you could use an awl or other sharp object to scratch/carve your sayings into the handle instead of stamping. It might help to pencil in your design or saying before carving. Then you could go in afterward with the fine tip marker to darken it just like you would if you’d stamped it.
We can’t wait to see how your projects turn out, because WE LOVE THIS STUFF!

Very nice idea
LikeLike
Those are some pretty fancy spoons I’ll give you that 😉
LikeLiked by 1 person
Cool idea!!
LikeLike
Cute
LikeLike
I love this idea
LikeLiked by 1 person
These are so cute!
LikeLike
So cute!! This would a great personalized gift!
Tonee
https://infoellablog.wordpress.com
LikeLike
Wow! Such a cool idea I love it! 😀
LikeLike